
New Verification
The New Verification page is the linear wizard that opens when you click New Verification anywhere in the portal. It is the only path to creating a verification — keeping the flow linear means every record on the Verifications list has the required attribution, matter, and consent captured up-front.
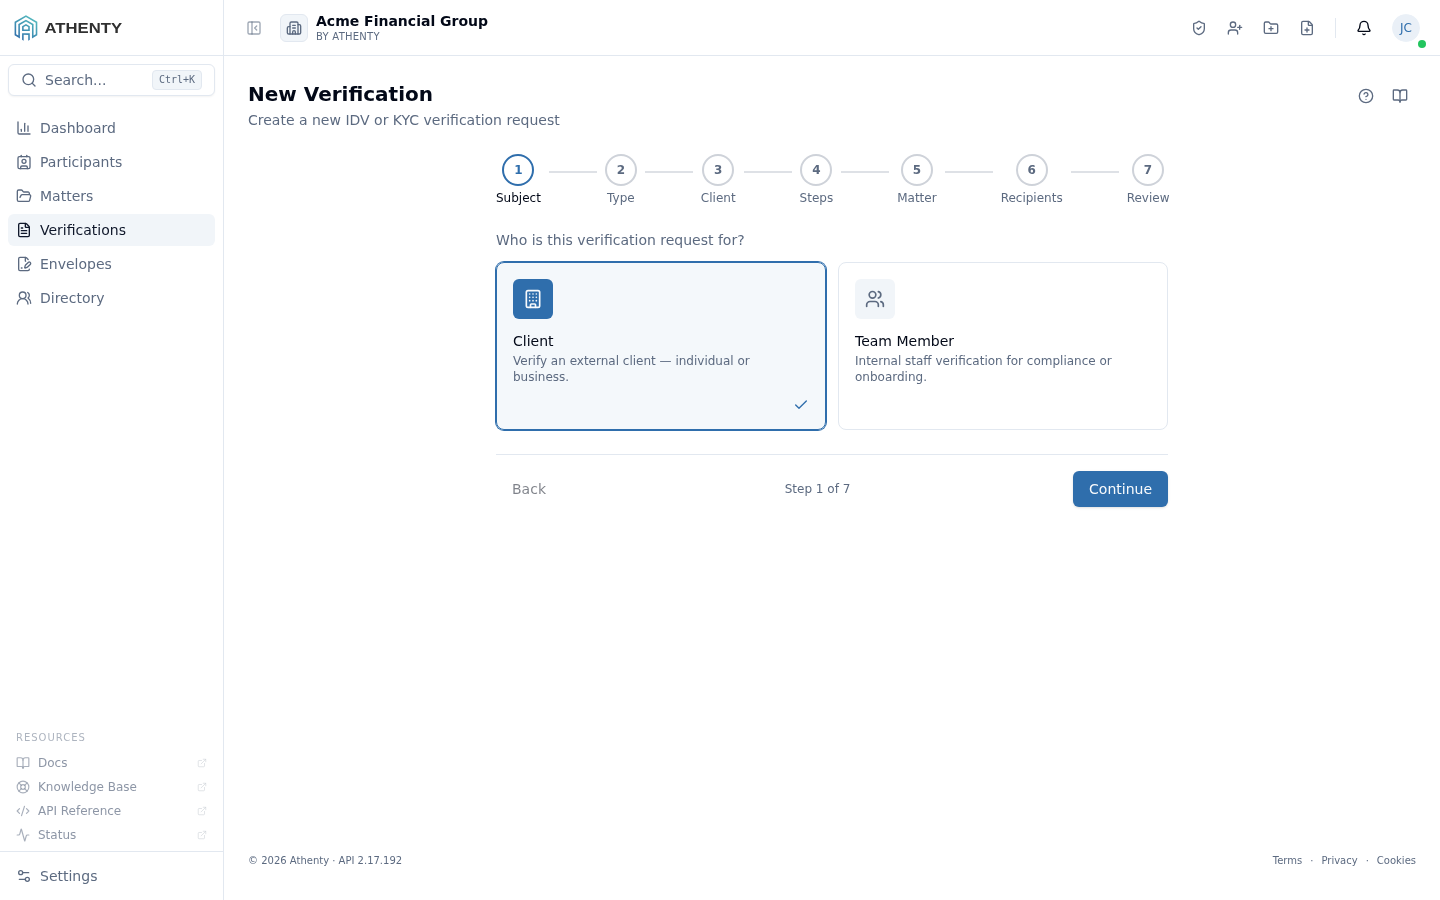
Anatomy of the page
Section titled “Anatomy of the page”1. Page header
Section titled “1. Page header”A simple PageHeader with the title New Verification and a one-line description. The wizard does not put a primary action here — submit lives at the end of the wizard itself, on the Review step.
2. Step rail
Section titled “2. Step rail”The vertical step rail on the left is the StepWizard component. Steps light up as you complete them, and you can jump backwards by clicking any completed step. Forward navigation requires the current step’s gating condition (e.g., a type selected, a matter attached) to be satisfied.
3. Step body
Section titled “3. Step body”The body changes per step — selectable cards on Subject and Type, a searchable list on Client/Member, a checkbox grid on Steps, an inline matter picker on Matter, a recipient form on Recipients, and a summary on Review.
The seven steps
Section titled “The seven steps”1. Subject
Section titled “1. Subject”Choose between Client (external) and Team Member (internal). Switching clears any previously selected client or member.
2. Type / Template
Section titled “2. Type / Template”Four cards:
- Default — your organization’s preset; the badge shows the step count and base type
- IDV Template — document + person + biometric_face + attestation
- KYC Template — IDV plus location, contact, PEP/HIO, consent
- Custom — empty step list to build by hand
3. Client / Member
Section titled “3. Client / Member”A searchable list of existing clients or team members. For clients you can also create a new one inline (name, email, type, country) without leaving the wizard. Selecting a row pre-fills the subject contact fields on Review.
If the client you pick is an Entity, this step also asks for the authorized representative — see below.
Verifying an Entity — the authorized representative
Section titled “Verifying an Entity — the authorized representative”An entity cannot present identification; a person does, on its behalf. So whenever the subject is an Entity (corporation, partnership, trust, estate), the wizard requires you to identify the authorized representative who provides the verification and completes the intake. The wizard will not let you continue without one.
This is what lets the record answer, months later, who actually provided these details, and who is accountable for them.
You can name:
- an existing individual — search the directory by name or email; or
- someone new — choose + Add new participant in the same picker and create them inline. The representative does not have to be in your directory beforehand.
A representative is always an individual participant, never another entity. You also select the role they act under (Director, Officer, Trustee, Authorized Signatory, …). That role is stored on the verification and, once the verification completes, links the individual to the entity in the directory.
”Also verify this representative’s own identity”
Section titled “”Also verify this representative’s own identity””An entity verification is sent to the representative, and that one session can do double duty — verifying her identity and collecting the entity’s information. The checkbox controls this:
| Toggle | Subjects of record | Use when |
|---|---|---|
| On — the default for a new or unverified representative | Two: Acme Holdings Inc. via Jane Doe, Authorized Representative and Jane Doe — Individual | You have not identified this person before. An entity cannot be vouched for through someone who has never been identified. |
| Off | One: Acme Holdings Inc. via Jane Doe, Authorized Representative | The representative already holds an approved identity verification — whether their own, or one taken while they answered for an entity — and you only need the entity’s. |
Athenty defaults this on when the representative is new to your directory or has no approved identity verification on file, and off when they already have one. The requester can override it either way.
Turning it off never removes the representative — she remains named on the verification, appears in the subject line, and is still linked to the entity. It only means this particular session did not verify her.
How the subject reads
Section titled “How the subject reads”The subject of an entity verification always names the entity and the person answering for it:
Acme Holdings Inc. via Jane Doe, Authorized Representative
The representative herself sees “Verify your identity as Authorized Representative of Acme Holdings Inc.”, so it is unambiguous that she is acting on the entity’s behalf rather than being profiled personally (unless the toggle above also applies).
For an entity verification the subject contact (name, email, phone) is the representative’s — she is the person who receives the invite and completes the session, not the entity’s general mailbox.
4. Steps
Section titled “4. Steps”A grid of every available step. Each row shows:
- A checkbox (disabled if required, e.g.,
documentfor IDV/KYC) - The step label and an estimated duration in minutes
- A price badge (amber border) for paid lookups
- A
Requiredbadge for non-removable steps
If your role is Member, paid steps are locked with a tooltip pointing you to an admin. The bottom banner totals the cost of any selected paid lookups.
5. Matter
Section titled “5. Matter”A required step. The picker reuses the same component as the envelope flow and Athenty Snap, so you can search across open matters or create a new one in place. The wizard refuses to advance until a matter is attached.
6. Recipients
Section titled “6. Recipients”Optional third-party recipients who receive a copy of the verification report on approval. Each recipient has a name, email, and optional organization. Recipients are added or removed inline.
7. Review
Section titled “7. Review”A side-by-side summary of every previous decision plus subject contact fields (first/last name, email, phone). Subject contact pre-fills from the chosen client/member but can be overridden — handy when a client’s preferred email differs from the one on file. Overrides do not modify the client record.
Submitting
Section titled “Submitting”Clicking Create & Send on the Review step:
- Creates the verification (
initiatedstatus). - Delivers the invite via the configured default channel.
- Transitions the verification to
in_progress. - Navigates to the verification detail page.
If the request includes paid steps and your tenant has no payment method on file, the API returns 402 and the wizard redirects you to Settings ▸ Billing with a toast.
Unsaved changes guard
Section titled “Unsaved changes guard”If you started filling in the wizard and try to navigate away (browser back, sidebar nav), you are prompted to confirm. Submission via Create & Send bypasses the guard automatically.
Permissions and scope
Section titled “Permissions and scope”| Role | Can use the wizard | Paid steps |
|---|---|---|
| Owner / Admin | Yes | Can toggle freely |
| Member | Yes | Locked — must ask an admin |
| Viewer | No (button hidden on the list page) | n/a |
Troubleshooting
Section titled “Troubleshooting”| Symptom | Most likely cause | Fix |
|---|---|---|
| Continue button greyed out | Current step’s gating condition not met | Pick a Type / select Steps / pick a Matter — whichever is the current step |
| Paid step locked with tooltip | Your role is Member | Have an owner/admin toggle paid steps |
| Submit fails with billing redirect | No card on file but request includes paid steps | Add a card in Settings ▸ Billing and resubmit |
| Inline client/matter create fails | API validation (duplicate, missing fields) | Read the toast; fall back to selecting an existing record |
| Wizard reset on tab close | Wizard state is in memory only | Use a draft (start the request and stop on Drafts tab — that persists server-side) |
Related pages
Section titled “Related pages”- Verifications — list of created verifications
- Settings ▸ Verification Defaults — your org’s default template
- Settings ▸ Billing — payment method for paid steps